Initial Machine Setup
Once your slot machine arrives, there are several important steps to follow to ensure your machine functions properly for years to come.
If you haven’t already, decide where in your home or business you want to set up your slot machine(s). It is important to keep in mind your slot machine runs on a normal household 120 Volt AC grounded outlet. For safety, try to find a location where an extension cord is not required.
It is important to remember the slot machine weighs approximately 225 lbs. It is crucial that if you have not purchased a slot machine stand, to place the machine on something not only capable of holding the weight, but something that will not allow the machine to tip over while being played. Gambler’s Oasis always recommends the use of a slot machine stand.
Once you have your slot machine in place, it is absolutely necessary to allow the slot machine to adjust to a normal room temperature of greater than 60 degrees and less than 90 degrees. If you live in a cold climate and your machine has just arrived, put the machine in your desired location and then open the machine door to allow the interior of the machine to warm up. This usually requires several hours. Plugging the machine in right away and turning it on may result in damaged electronics and may void your warranty.
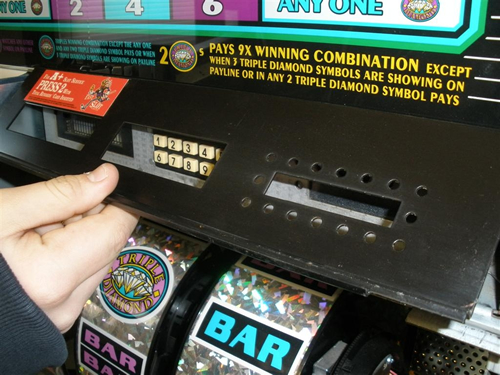
With the slot machine main door open, remove the coin tray by lifting up and pulling out the tray. Don’t be surprised if the large magnet on the speaker on the right side wants to grasp the bottom of the cashbox door. Simply pull it out and down to remove the tray.

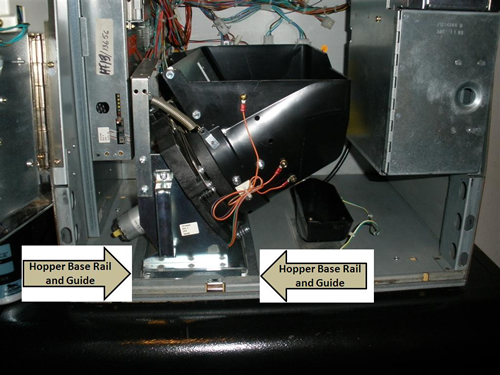
The hopper is on the bottom floor of the machine and slides out on two base rails along two metal guides. Slide the hopper out slowly by grasping the handle with your left hand and supporting the hopper with your right hand. Do not use the black hopper bowl to pull the hopper out of the slot machine.
For shipping purposes the hopper may contain the top candle wrapped in bubble wrap that must be installed on the top of the machine. Gambler’s Oasis will ship most slot machines with the top candle already installed. However on certain sized slot machines, the top candle will be removed to prevent damage during shipment. If your slot machine has been shipped with the candle removed, instructions for installation are found at the bottom of this page. Also note the power cord will be either in the hopper or directly behind it.
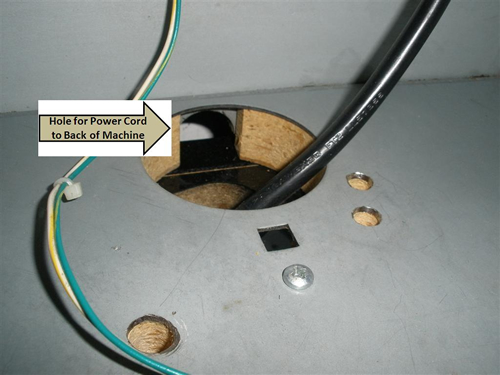
The power cord plugs into the right side of the Power Distribution Unit located on the back wall of the slot machine. When sitting the machine on a slot machine stand, it is usually best to run the power cord through the hole in the bottom of the slot machine and then through the hole in the slot machine stand provided the holes are aligned. Sometimes moving the machine just an inch or so will allow the holes to align, but be careful not to move the machine too far on the stand as it could tip over if moved too far.
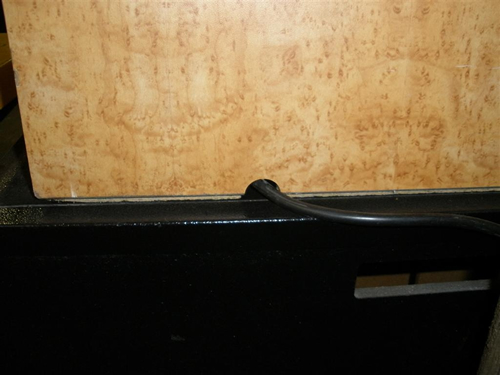
If your slot machine is placed on a stand or platform that does not have a hole below the hole in the slot machine, the power cord can exit out on the back of the slot machine. This allows for the machine to set flat while not crimping the power cord. This opening is found in the same area as above although the cord slips through a notch on the back of the machine. It is usually best to run the power cord through the hole starting at the back bottom of the slot machine using the smaller end of the power cord which will plug into the Power Distribution Unit.
Often it is necessary (and easier) to move the machine toward the edge of the stand or platform to feed the cord through, and then move it back in place. Again caution should be taken not to allow the machine to tip over when moving it toward the edge of any stand or platform.
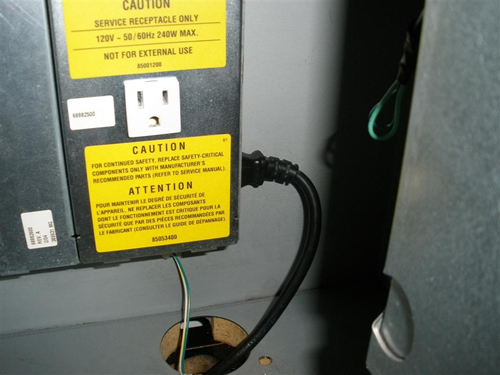
The power cord plugs into the right side of the Power Distribution Unit located on the back wall of the slot machine. Always plug the end of the power cord into the Power Distribution Unit BEFORE plugging the machine into any electrical outlet. Make sure the cord is plugged in firmly to the Power Distribution Unit and the power cord is fed out of the machine.
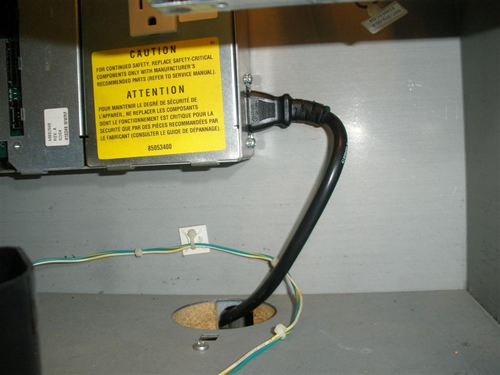
As with any electronic device, we highly recommend you plug the power cord into a surge protector prior to plugging into an electrical outlet. Note on many IGT S2000 slot machines, once the machine is plugged in, a service light will illuminate in the back of the machine. This is normal and does not indicate the main power switch has been turned on.
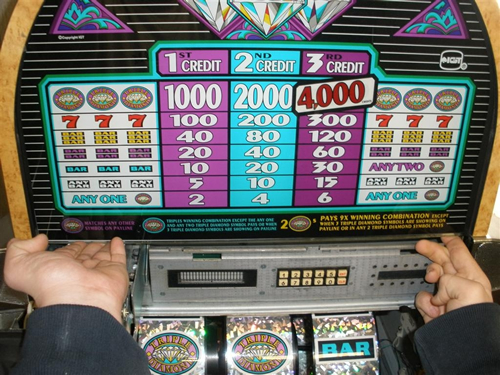
Place the hopper back into the slot machine making sure it slides in easily and completely with the base rails on hopper guides on the bottom of the machine. The hopper plugs into a receptacle toward the back of the machine. It is designed to fit in easily without using excessive force.
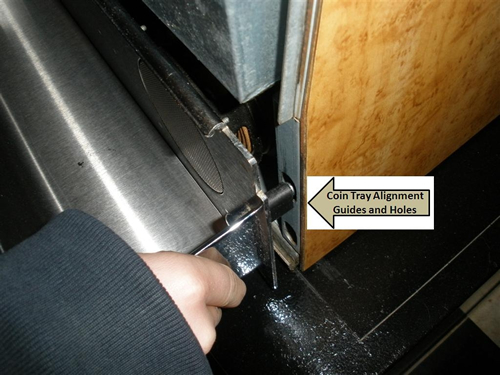
The coin tray can be easily put back into place by ensuring the alignment guides on the coin tray match up to the top alignment holes on the bottom side of the machine. The tray should be pushed down into place. Make sure the tray is even when pushed into place. If the coin tray is not aligned and even, remove the coin tray, and repeat the procedure.
It is now time to fill the hopper with coins or tokens. The type coin or token must match the denomination the machine has been set up for. You cannot use nickels in a quarter machines nor can you use quarters in nickel machines without modifications to the machine. The machine will not work and may cause serious coin jams to occur if the wrong coin or token type is used.
Fill the hopper with at least 500 correct type coins or tokens.
NOTE: Now follow the Top Candle Installation steps below if your slot machine was shipped without the top candle installed.
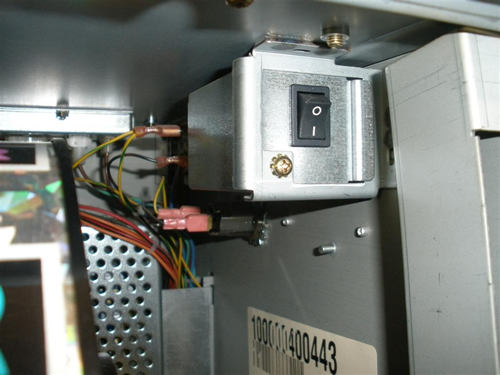
Once you are certain the machine and its components have warmed to room temperature, it is time to turn on the power. The power switch can be found with the main machine door open and is located about midway down on the right side. Turn the power switch on.
Close the main slot machine door and lock it with the key provided. You will see a number of lights illuminate. If your slot machine accepts paper currency, you may hear the bill validator and bill transport going through a series of start-up tests.
On IGT S2000 slot machines, the message panel on the front of the machine will indicate that the machine is going through a series of internal tests and including memory. When the tests are complete, the reels will spin into place.
On older IGT S and IGT S+ Slot Machines, it is a good idea to wait a few minutes prior to playing. On the IGT S2000 Slot Machine, it is ready to play. Depending how the slot machine you purchased is configured, insert paper currency or coins or tokens and spin the reels.
Begin playing, and let the fun and excitement begin! Good Luck!!!
Top Candle Installation
The last step prior to powering up the machine is to install the top candle light if it was removed for shipment. If the candle was removed for shipment, it will be found wrapped in bubble wrap and placed in the machine hopper. Unwrap the packaging and straighten the three wires extending out of the bottom of the candle. Also if there is a black gasket on the bottom of the candle, the wires should be fed through it as it sits between the candle and the top of the slot machine.
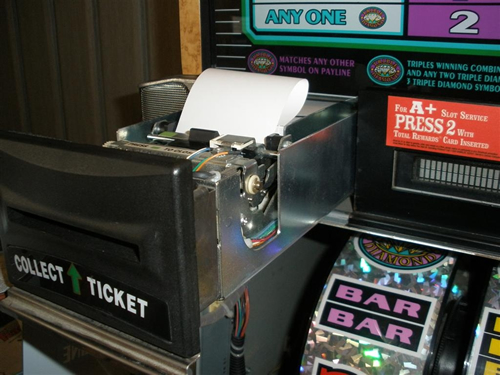
To install the candle you must carefully remove the top glass. To do so, you must have the main slot machine door wide open. If the machine is equipped with a top ticket printer, you must pull the bottom of the printer out far enough to see where the ticket paper is located, and note the area large enough to place a couple of your left fingers under.
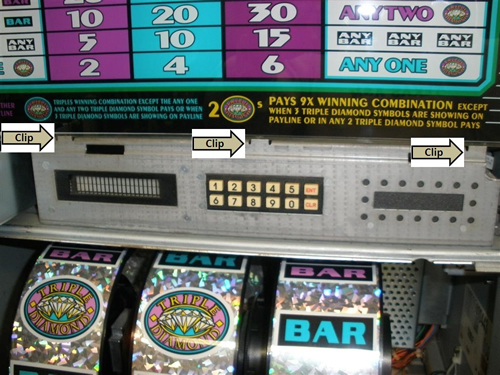
Remove the top metal trim strip which is a cover plate to the right of the ticket printer and/or is located along the bottom of the top glass. There are a couple of clips on the back of the metal trim strip that fit into notches on metal bracket which holds the top glass. The metal trim strip should be lifted upwards and outwards to remove. Once the metal trim strip is removed, the next step is to remove the top glass. Note that some top metal trim strips have a slot in the top that holds the top glass and they must be removed very CAREFULLY as to not damage or drop the top glass.
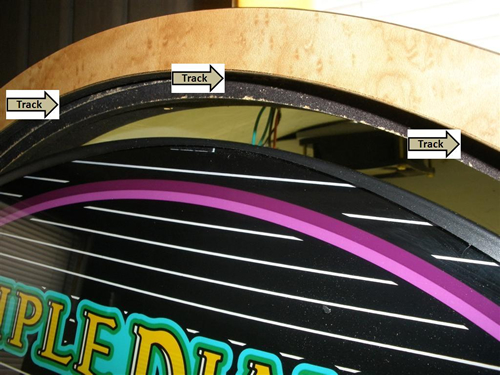
You can now see the top glass is held in place by usually two or three clips that rise above the metal bracket behind the top metal trim strip. CAREFULLY and SLOWLY lift up on the top glass from both bottom edges until the top glass until it is high enough to gently pull it forward and allowing it to slide down and away from the top track and clips holding it in place.
Once the top glass has been removed, put it somewhere where it will not get knocked over or broken!
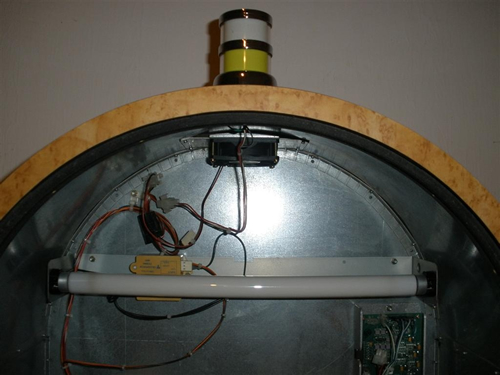
Look at the top of the area in the top box of the machine where the top glass was removed. You will find an opening at the top of the machine where the wires of the candle will fit through as well as the connection plug for the wires. Proper connection of the green grounding wire is addressed below.
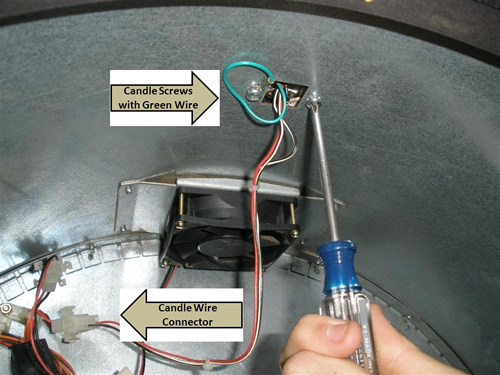
Take the candle and remove the two screws from the bottom. With the wires being straight, place the candle on top of the slot machine and feed the wires through the top of the slot machine. If the type candle for your slot machine has a large round black gasket, be sure to run the wires through the black gasket between the candle and the top of the slot machine. Align the screw holes from inside the top box of the machine being sure they align through the machine, the black gasket (if included) and into the candle. Start one screw prior to tightening, and ensure the candle and the black gasket (if included) are correctly placed on top the slot machine.
With the other screw, run it through the ring terminal on the end of the green wire prior to starting it through the top of the machine. Once the screw is through the ring terminal, start it through the top of the slot machine, and then slowly thread it into place in the bottom of the candle.
Tighten both screws securing the candle into place. Now connect the wire connector hanging down from the candle into the open connector in the top box of the slot machine.
It is now time to replace the top glass. If your slot machine has a top ticket printer, ensure the ticket printer is still pulled out so you can place your fingers in the opening while replacing the top glass. Carefully and slowly lift up the top glass placing each hand under the bottom of the top glass. Slide it into the upper edge track on the top box of the slot machine carefully lifting it so it slides into the tracks while being able to push the top glass back far enough to clear the two or three raised clips on the metal bracket where the top glass holding track is located.

Gently and slowly lower the top glass behind the clips so as to allow them to hold the glass in place. If properly secured, the top glass will not be able to slide down or out of its position. Keep a secure hold on the top glass until you are certain it is secured in the proper position.
Replace the top metal trim strip by aligning the two or three hooks the back through the metal bracket that supports and holds the top glass. Once the hooks on the back are in place, gently push the top metal trim strip down and it should snap into place. If you have a slot machine with a top ticket printer, close it tight into position.
Return above to the Power Switch On section and photo….